Upgrade to HTTP/3 with Envoy
HTTP/3 is bringing significant improvements in terms of performance and security. The underlying protocol, named QUIC, brings seamless connection migration while roaming.
Envoy v1.22 has made QUIC GA for downstream connections. See how to enable HTTP/3 with Envoy as an edge proxy in the following blog post.
Why a new version of HTTP?
Compared to the old-timer HTTP/1.1, HTTP/2 can still sound newish to many of us, but it has definitely taken over its predecessor on all major websites. According to this recent article: "Cloudflare Radar estimates that 8% of internet traffic is HTTP/1-based, followed by HTTP/2 at 67%, and HTTP/3 at 25%."
In 2015, HTTP/2 was officially published as a final spec of what Google had begun a few years before with its own SPDY protocol. HTTP/2 enables concurrent streams over a single TCP connection, thus supplanting two decades of workarounds (like the HTTP keep-alive, or browsers' parallel connections) for the HTTP/1.1 limitations. HTTP/2 fixed the HTTP head of line blocking problem, where clients had to wait for the first request in line to finish before the next one could go out. All major websites offer HTTP/2, which generally improves the Speed Index score.
This is good but we can always do better. HTTP/2 still runs on top of TCP, like most of all the L7 applications, and there is a good reason why. TCP has a great story with flow-control, packet loss, and it’s not that simple to change millions of routers from 443/TCP to any other port and protocol.
That being said, Google thought differently, again. They basically reimplemented all the greatness of TCP in a new protocol called QUIC. This fairly new protocol runs over UDP and also enforces encryption with TLS 1.3

Note that TLS is made part of QUIC, and stream multiplexing as well. You may wonder why such a move? the main reason is performance over low quality networks. With TCP and the many multiplexed streams over it, when a single TCP packet is lost, then all the streams are impacted and all packets must be sent again. This is known as "TCP Head of line blocking". See the schema below.
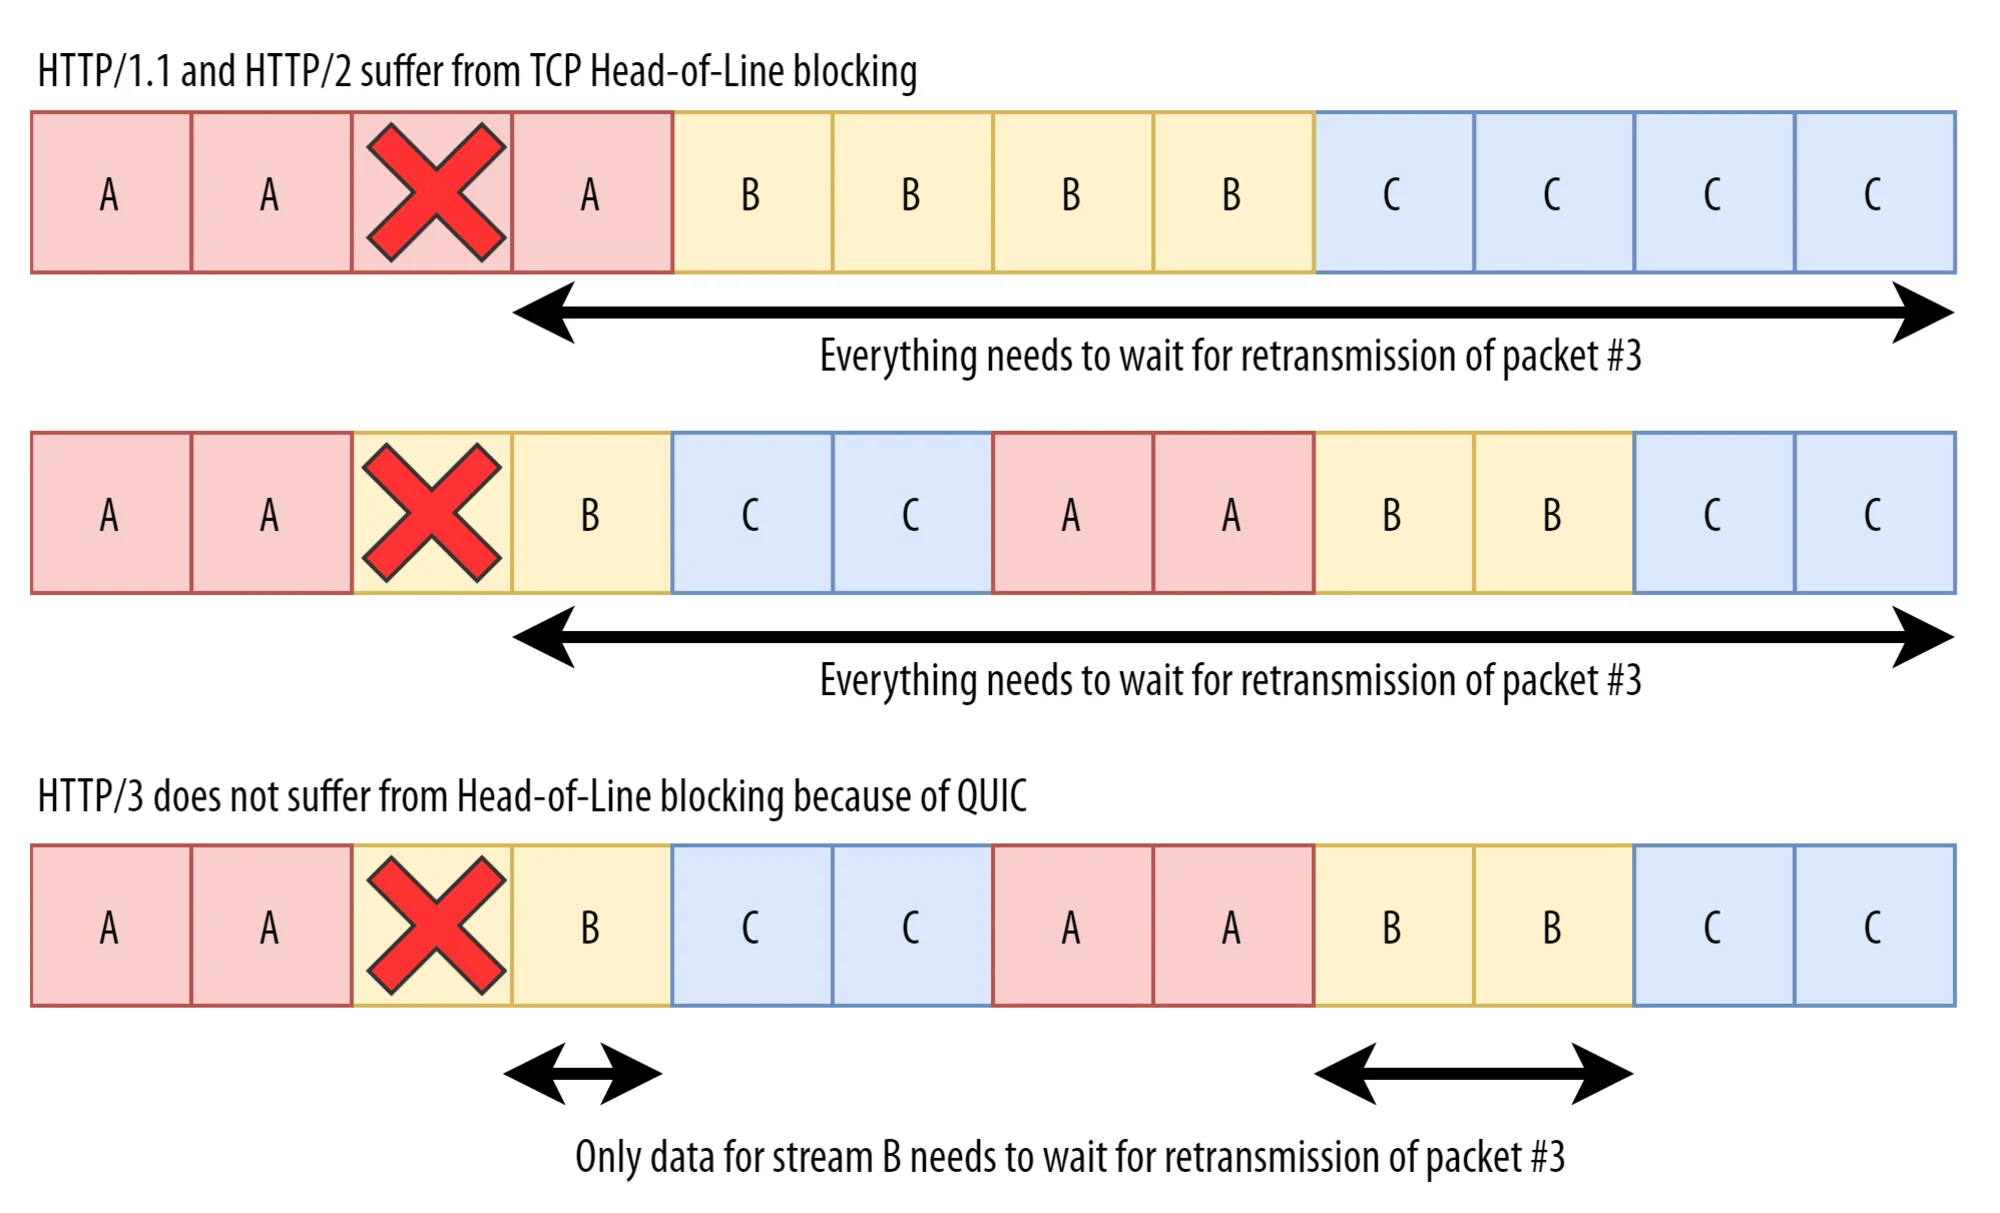
As you can see in the schema above, with QUIC over UDP, these streams are independent and when a packet is lost, it only impacts one stream. That’s why HTTP/3 uses QUIC under the hood.
There is more! QUIC allows for 1-RTT connection setup, reducing the latency dramatically for connection establishment:
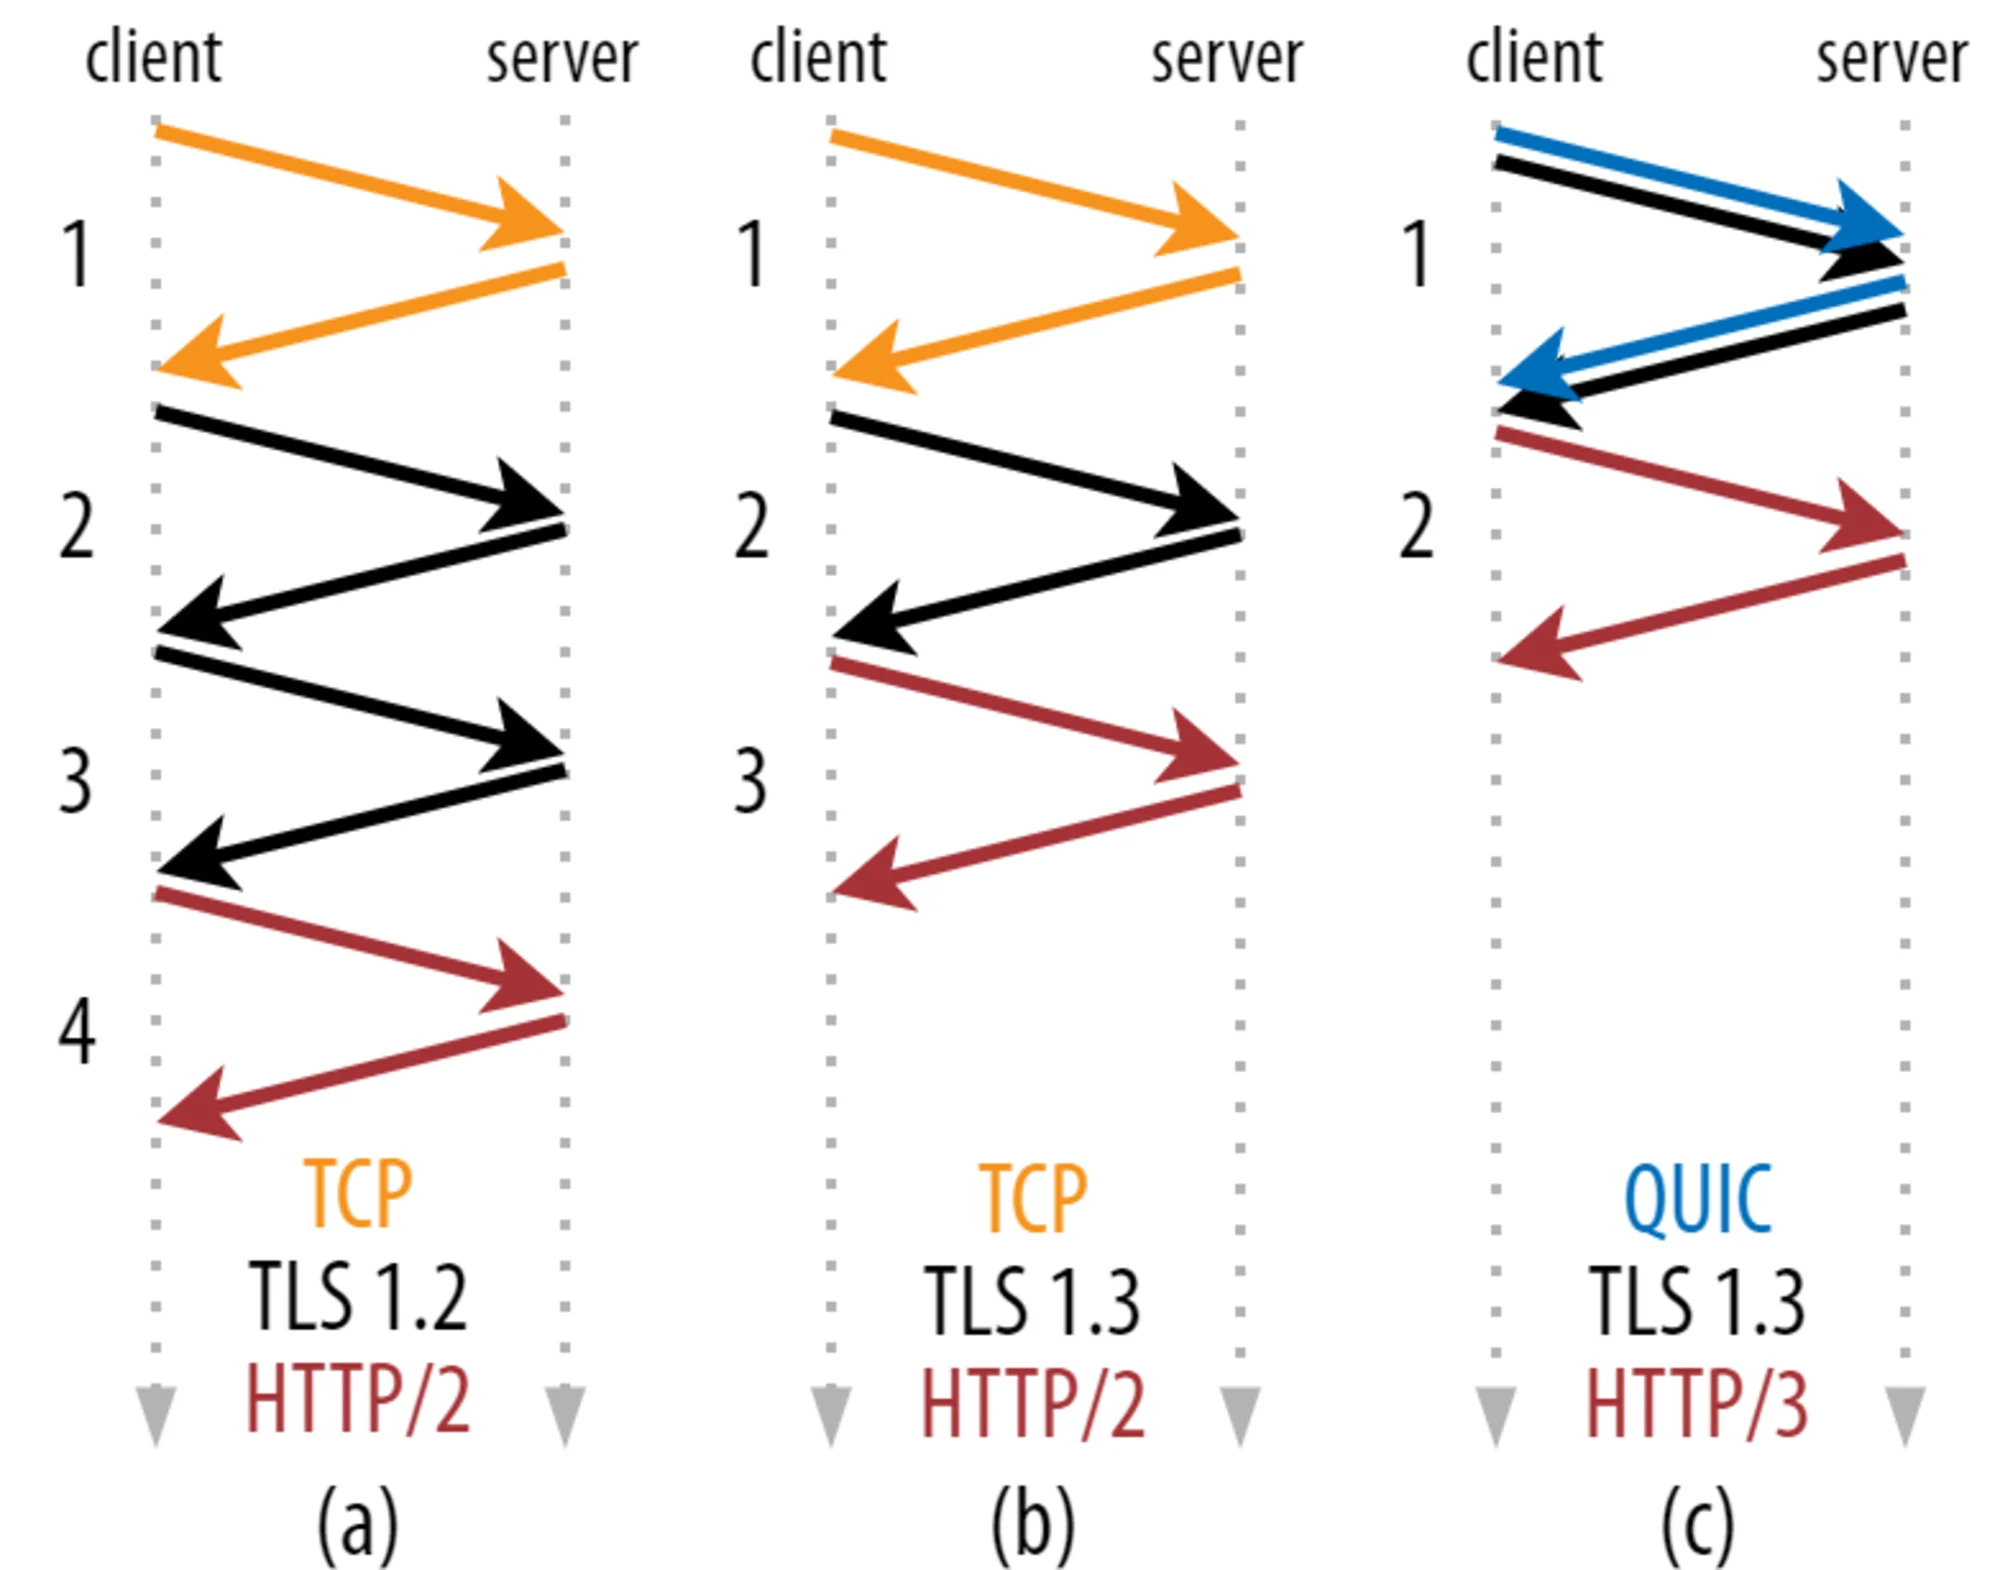
When a TLS session exists (after the first request), QUIC can also leverage TLS 1.3 session resumption and connection initialization can even be performed along with the HTTP request, bringing a top-notch 0-RTT setup (no extra round-trip).
Also, QUIC introduced connection IDentification. Using connection IDs enables transparent connection switching, as in when you change network from home Wifi to 5G without even losing the ongoing downloads.
Finally, after many drafts over the last six years, HTTP/3 just made it into a final RFC 9114, on June 6.
Takeaways
Let’s summarize all the sweetness:
-
stream multiplexing, higher throughput, especially when using low-quality networks
-
reduced connection latency, down to 0-RTT with TLS 1.3 session resumption
-
encryption enforced
-
QUIC adds IDs to connections, enabling client and server L1 switching (as in roaming)
More protocols could leverage QUIC in the future. There is some work in progress for DNS over QUIC, SSH over QUIC, and also WebTransport, which could be a new revolution for web apps.
Local environment setup
The following sections describe how to set up a local environment, both for curl and Envoy.
curl
To have my curl binary enabled with HTTP/3 on MacOS, I started with this tutorial from CloudFlare (Kudos to their team for the homebrew recipe! :heart:)
EDIT: the page was moved to a general-purpose landing page about HTTP/3. Original source is here.
So, I just patched their recipe with the latest version of curl:
then installed it with:
brew install -s curl.rbOnce installed, you can try it out with the --http3 flag:
curl -s -I --http3 https://www.google.com

HTTP/3 200
content-type: text/html; charset=ISO-8859-1
p3p: CP="This is not a P3P policy! See g.co/p3phelp for more info."
date: Sat, 28 May 2022 11:49:01 GMT
server: gws
x-xss-protection: 0
x-frame-options: SAMEORIGIN
expires: Sat, 28 May 2022 11:49:01 GMT
cache-control: private
...
alt-svc: h3=":443"; ma=2592000,h3-29=":443"; ma=2592000,h3-Q050=":443"; ma=2592000,h3-Q046=":443"; ma=2592000,h3-Q043=":443"; ma=2592000,quic=":443"; ma=2592000; v="46,43"
There you go! HTTP/3 is enabled on google.com
HTTPBIN
Let’s run httpbin as a simple backend for our requests:
docker run --rm -p 8080:80 -e GUNICORN_CMD_ARGS="--capture-output --error-logfile - --access-logfile - --access-logformat '%(h)s %(t)s %(r)s %(s)s Host: %({Host}i)s'" kennethreitz/httpbinEnvoy
HTTP/3 became GA with Envoy v1.22:
http3: downstream HTTP/3 support is now GA! Upstream HTTP/3 also GA for specific deployments. See here for details.
To run Envoy locally on a macbook, I first wanted to use the build for macOS, but it was not ready as of writing this article.
So, I used the official docker image for Envoy v1.22:
docker run --rm \
    -p 10000:10000/UDP \
    -p 10000:10000/TCP \
    -p 9901:9901 \
    -v ${PWD}/config/10-http3/envoy.yaml:/tmp/envoy.yaml \
    -v ${PWD}/config/example_com_cert.pem:/tmp/example_com_cert.pem \
    -v ${PWD}/config/example_com_key.pem:/tmp/example_com_key.pem \
    envoyproxy/envoy:v1.22.0 -c /tmp/envoy.yaml
More details on the config below.
Testing Envoy with downstream HTTP/3
The following config snippet was picked from Envoy’s config samples in Github and adapted to route requests to the local httpbin backend:
A few interesting things to note:
-
there is a standard TCP listener on port 10000. The Envoy
routerfilter will simply return the following header:alt-svc: h3=":10000"; ma=86400, h3-29=":10000"; ma=86400 -
there is another listener, on 10000/UDP, with Quic options enabled. The transport socket is set to QUIC and the HCM is configured as usual.
From that point, you should be able to execute a query using HTTP/3:
curl -v -k --http3 https://127.0.0.1:10000/headers* Trying 127.0.0.1:10000...
* Connect socket 5 over QUIC to 127.0.0.1:10000
* Sent QUIC client Initial, ALPN: h3,h3-29,h3-28,h3-27
* Skipped certificate verification
* Connected to 127.0.0.1 () port 10000 (#0)
* h2h3 [:method: GET]
* h2h3 [:path: /headers]
* h2h3 [:scheme: https]
* h2h3 [:authority: 127.0.0.1:10000]
* h2h3 [user-agent: curl/7.84.0-DEV]
* h2h3 [accept: */*]
* Using HTTP/3 Stream ID: 0 (easy handle 0x7ff4ee814000)
> GET /headers HTTP/3
> Host: 127.0.0.1:10000
> user-agent: curl/7.84.0-DEV
> accept: */*
>
< HTTP/3 200
< server: envoy
< date: Tue, 24 May 2022 01:38:40 GMT
< content-type: application/json
< content-length: 198
< access-control-allow-origin: *
< access-control-allow-credentials: true
< x-envoy-upstream-service-time: 5
<
{
"headers": {
"Accept": "*/*",
"Host": "127.0.0.1:10000",
"Transfer-Encoding": "chunked",
"User-Agent": "curl/7.84.0-DEV",
"X-Envoy-Expected-Rq-Timeout-Ms": "15000"
}
}
* Connection #0 to host 127.0.0.1 left intactMonitoring
Quick Prom stack
Freely inspired from https://github.com/ninadingole/docker-images, here is a quick setup with Prometheus and Grafana (+ a few more):
git clone https://github.com/ninadingole/docker-images
cd docker-images/prometheus-grafana
docker-compose up -d
open http://127.0.0.1:3000
# login with admin/foobar
Scraping Envoy metrics
Envoy metrics are natively exposed in the Prometheus format on the admin interface.
In this setup, metrics are available at 127.0.0.1:9901/stats/prometheus.
So I’ve just added the following scrape config snippet:
scrape_configs:
  - job_name: 'envoy'
    scrape_interval: 5s
    metrics_path: "/stats/prometheus"
    static_configs:
         - targets: ['host.lima.internal:9901']
Note that I’m using Lima, as described in this previous article.
Visualizing metrics
Really straightforward, Envoy exposes new metrics with http3 in their name. Below is a basic example of the envoy_http_downstream_rq_http3_total metric:

You may want to observe additional metrics like envoy_listener_udp_downstream_rx_datagram_dropped in case clients send large payloads and your UDP listener is not configured properly. See also this note from the Envoy doc (and the prefer_gro option, publication).
Closing words
HTTP/3 comes as a natural evolution of the world’s most famous web protocol, trying to improve latency and resilience for both modern clients and lower-quality network equipment. The underlying QUIC protocol looks promising since it comes with encryption enabled and all the nice features that made TCP the king of reliability up to now - not only "as good as TCP" but even better!
It is OK to only enable HTTP/3 Envoy downstream and to continue connecting to upstream services over HTTP or HTTP/2. Envoy support for HTTP/3 upstream is not fully ready as of writing this article.