Passwordless authentication with WebAuthn, Keycloak and Istio

With the broader adoption of Istio as a Service Mesh, one of the common concerns is the end-user authentication at the Gateway level. Istio provides an extensible framework that allows for external authentication and authorization of incoming requests.
This article aims to demonstrate how you can configure Istio to use Keycloak as an external authentication provider for your services. Plus, we will configure Keycloak to use WebAuthn as a mechanism for passwordless authentication.
Passwordless authentication
Last year, big Internet players announced the end of user passwords and I’m all up for this! Who can remember dozens of passwords? Can you really rotate them frequently enough to counter various website hacks and password leakage? (biggest leaks 2022) Do you really trust password managers? (LastPass hacked) Today, I don’t.
The only authentication medium I trust is double-factor and, essentially, fingerprint authentication.
Tales of the Web
The Web is in constant motion, and we frequently see new web standards under the form of Web APIs. Indeed, the Web is not only a basic implementation of the Internet, nor just a famous protocol — HTTP — but it’s also a set of APIs that browsers (and other web clients) have to keep up with. New standards like Service Workers, WebSockets, the Fetch API, or the File API, to name a few, have greatly improved both the developer experience and the user experience over the last decade. Speaking of which, a new API called WebAuthn quietly made its way to overcome the good old user/password credentials binomial.
WebAuthn
The Web Authentication API — or WebAuthn — enables strong authentication with asymmetric cryptography, enabling passwordless authentication.

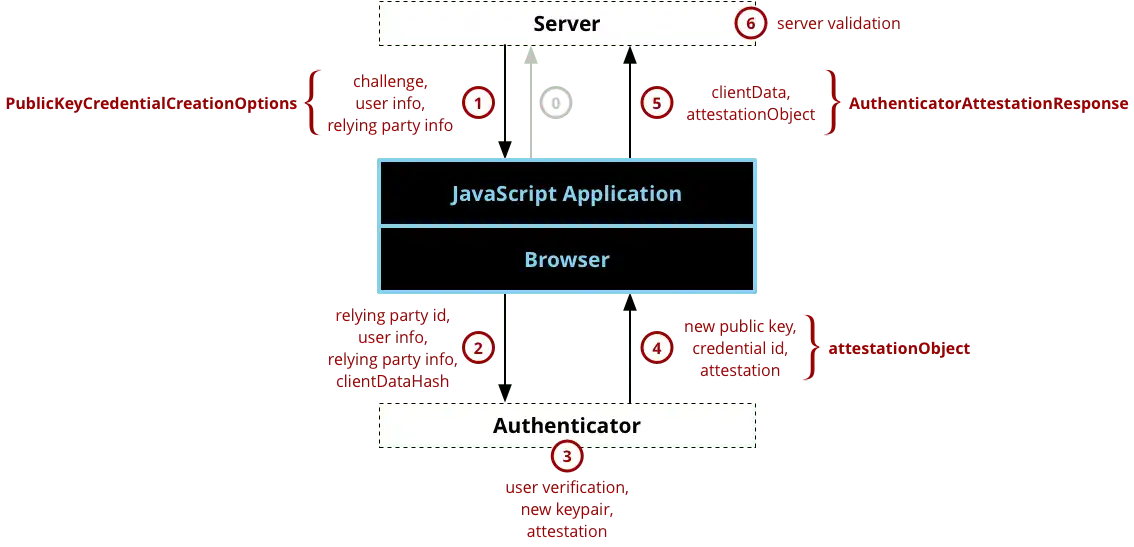
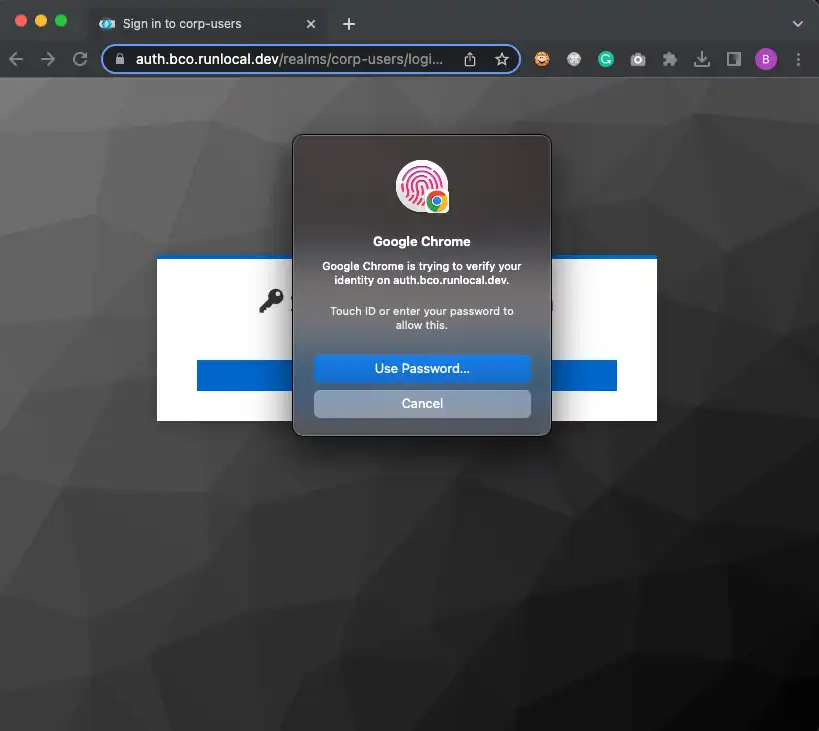
Long story short, websites implementing WebAuthn will send a Challenge to your browser that will trigger end-user identification with an Authenticator. Most often, Authenticator devices exist in the form of USB or Bluetooth Security Key or can even be built into your machine (like fingerprint sensors).
The Authenticator generates a key pair, which is basically a private key, that will stay safe on the device and a public key that will be shared with the server. Once the key pair is generated, the private key is used to sign the Challenge, and the public key is sent back to the server along with the Challenge. Finally, the server verifies the Challenge and stores the public key for further use, like user authentication.
Actually, it’s a bit more complex, but you get the point!
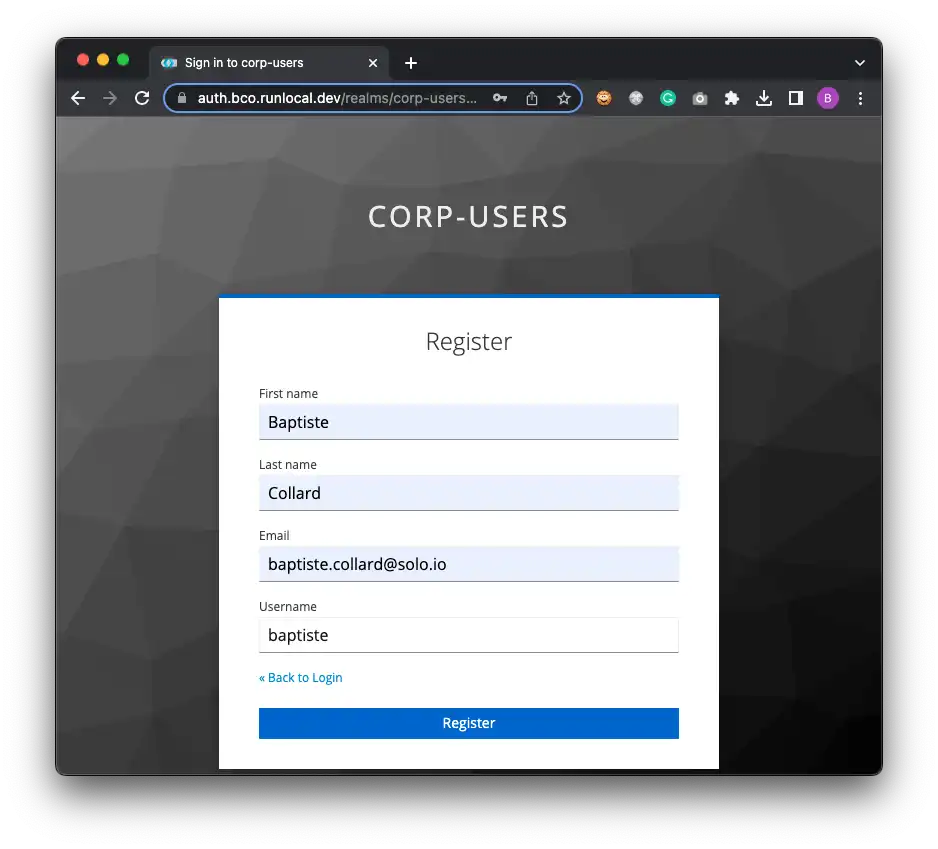
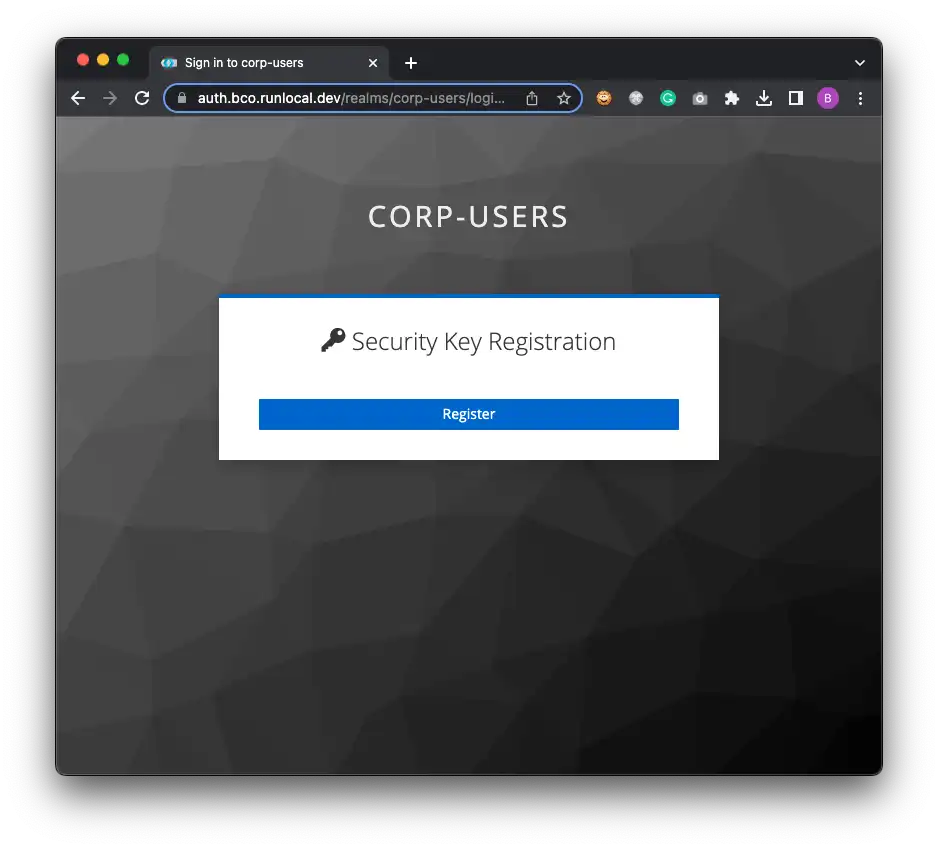
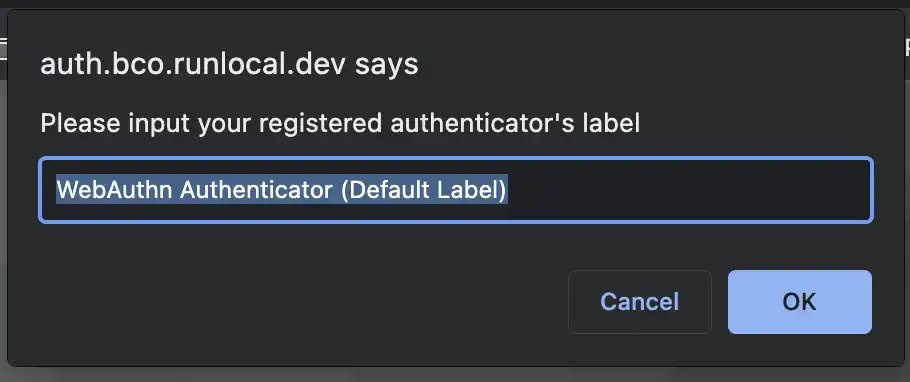
User registration flow with WebAuthn:
| Your browser may refuse to use WebAuthn if you are not using HTTPS. Depending on your platform and browser, self-signed certificates may or may not work. |
Keycloak and WebAuthn
Keycloak is a great open-source Identity Provider that everyone can adopt. As a battle-tested solution, Keycloak comes with a lot of flexibility in various areas like the following:
-
users and groups management
-
authentication flow
-
integration with third-party user directories or social connect
-
many more options are available for all the supported protocols, especially with OpenID Connect.
An often underestimated feature is the flow engine for authentication. It comes with a bunch of ready-to-use policies like "login forms", "reset password", "OTP", and also support for WebAuthn.
Keycloak is doing great with these things, and unless you want a fully branded and homemade login page, you definitely can leverage Keycloak for everything around end-user authentication.
Here is an example of a custom authentication flow involving the WebAuthn built-in step:
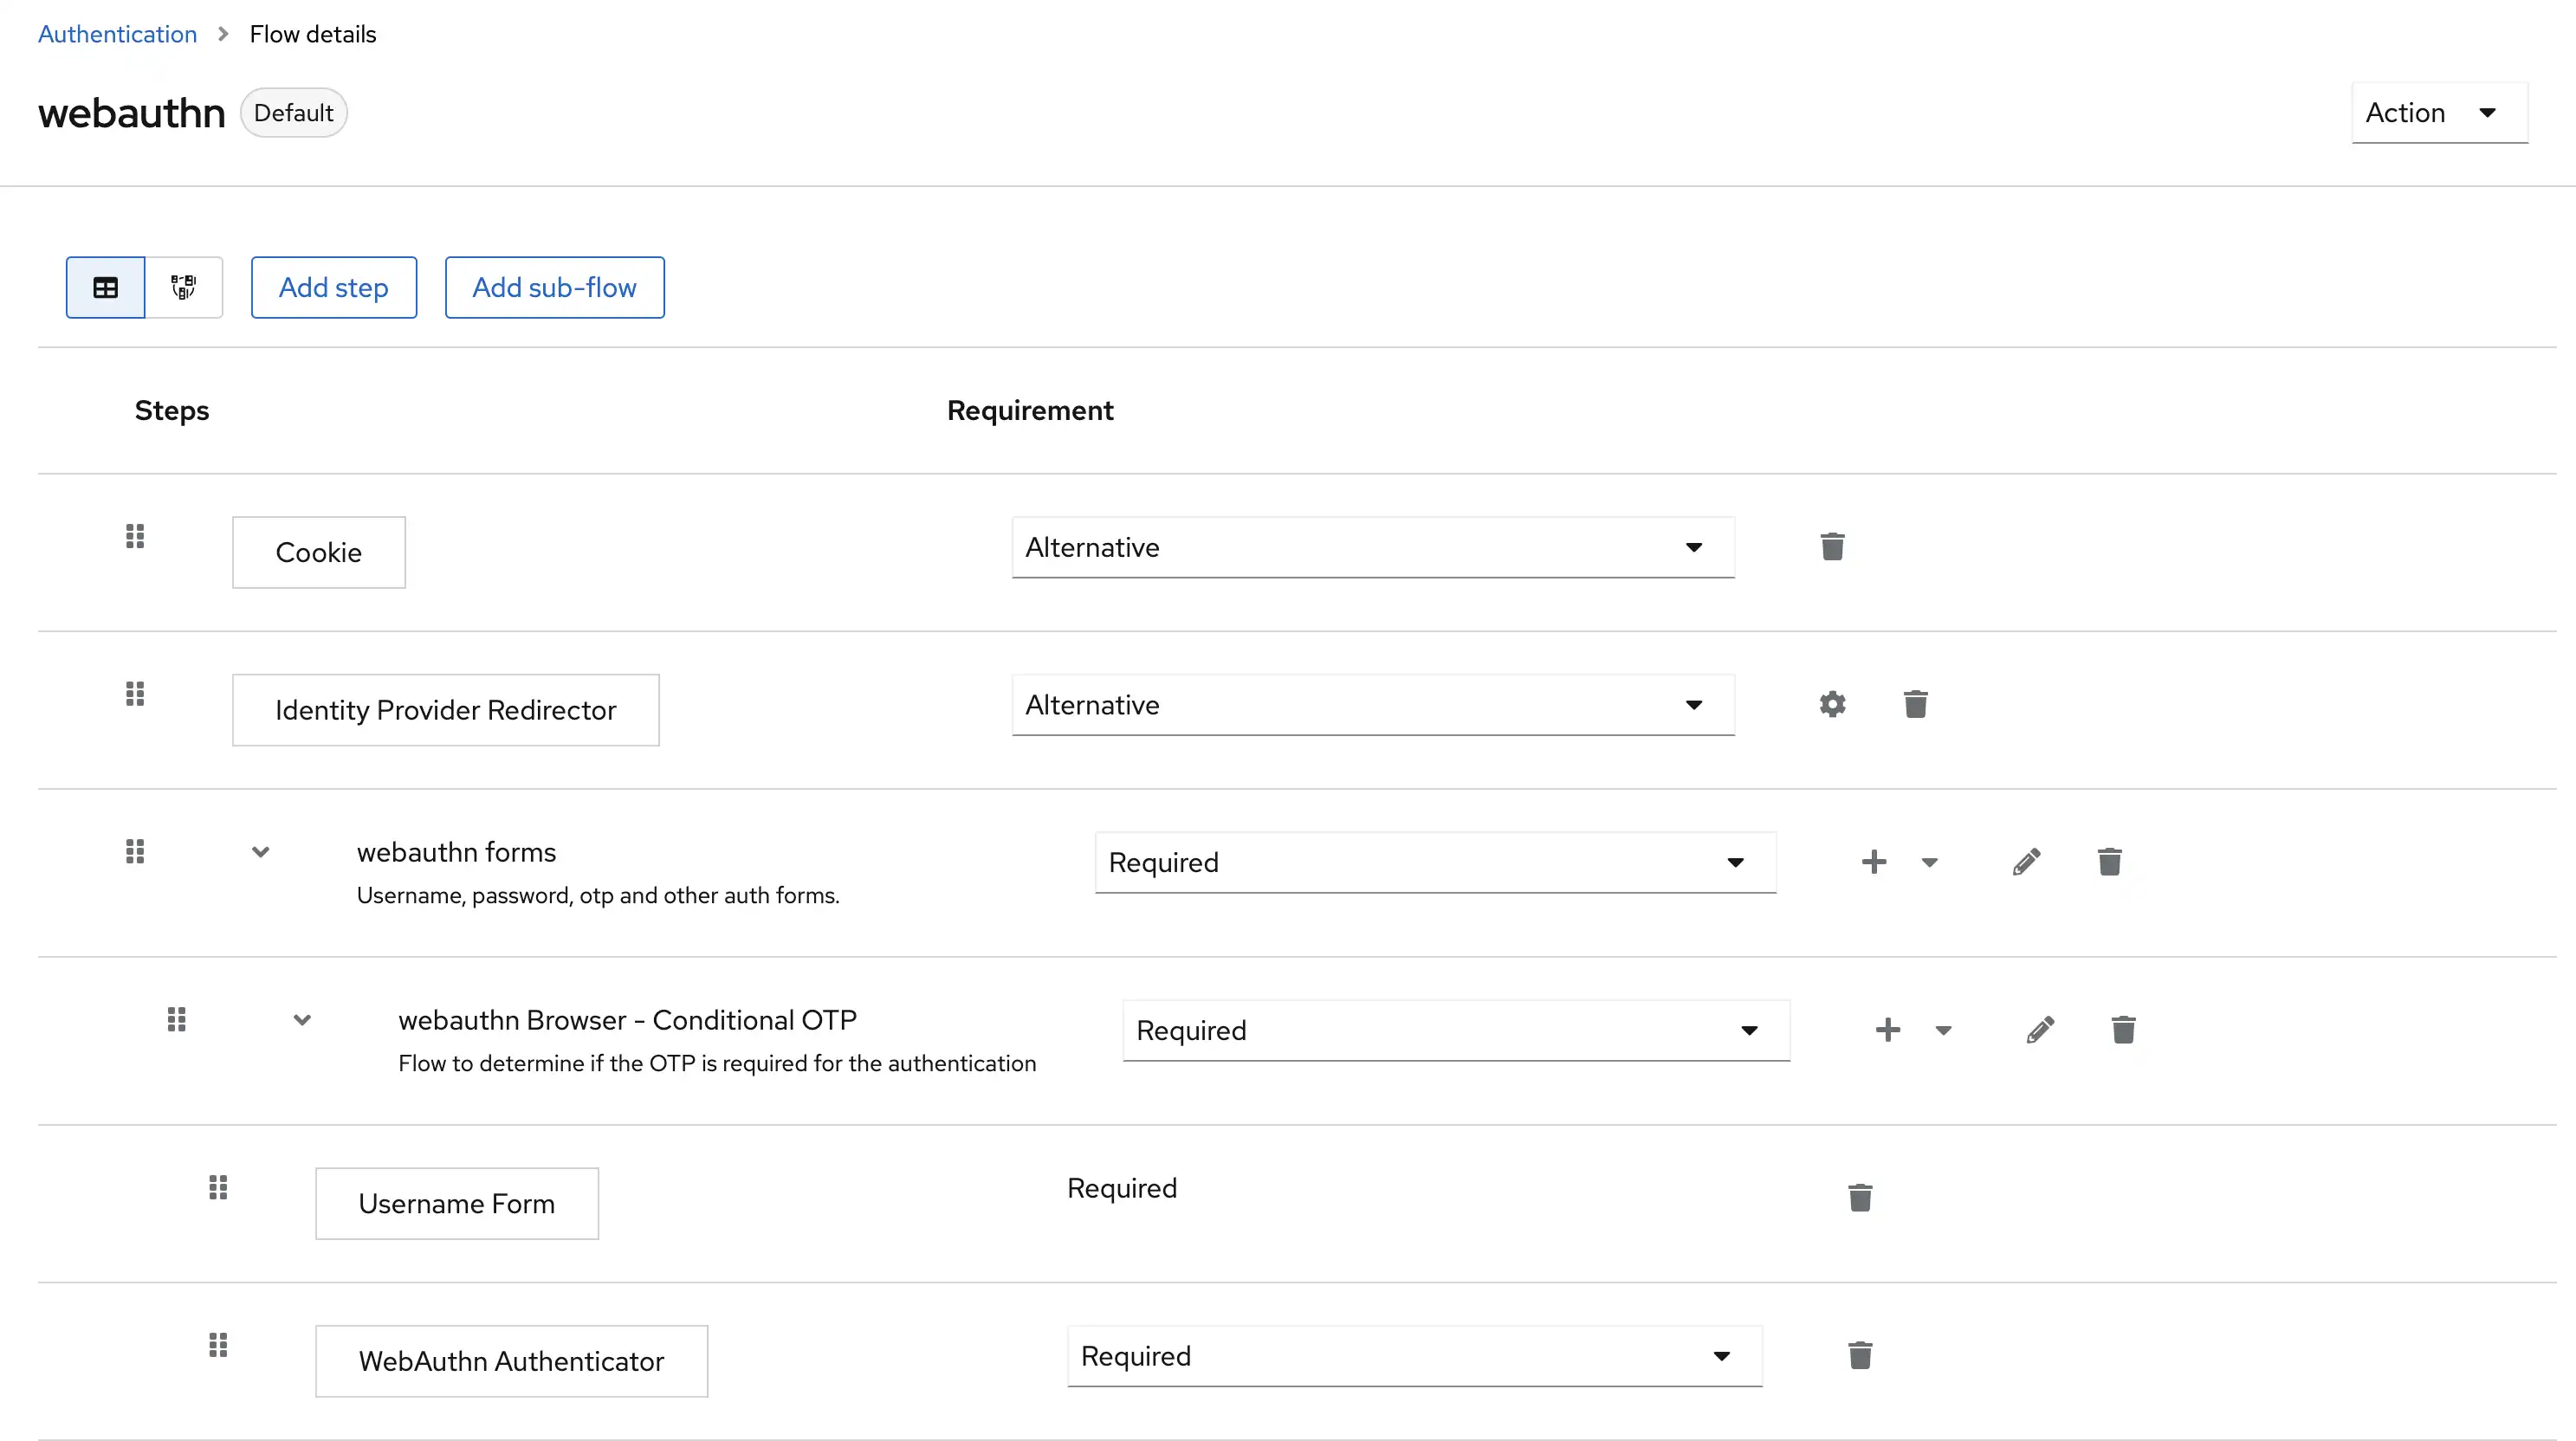
These steps are well documented in the official documentation.
Extending Istio
Extension providers
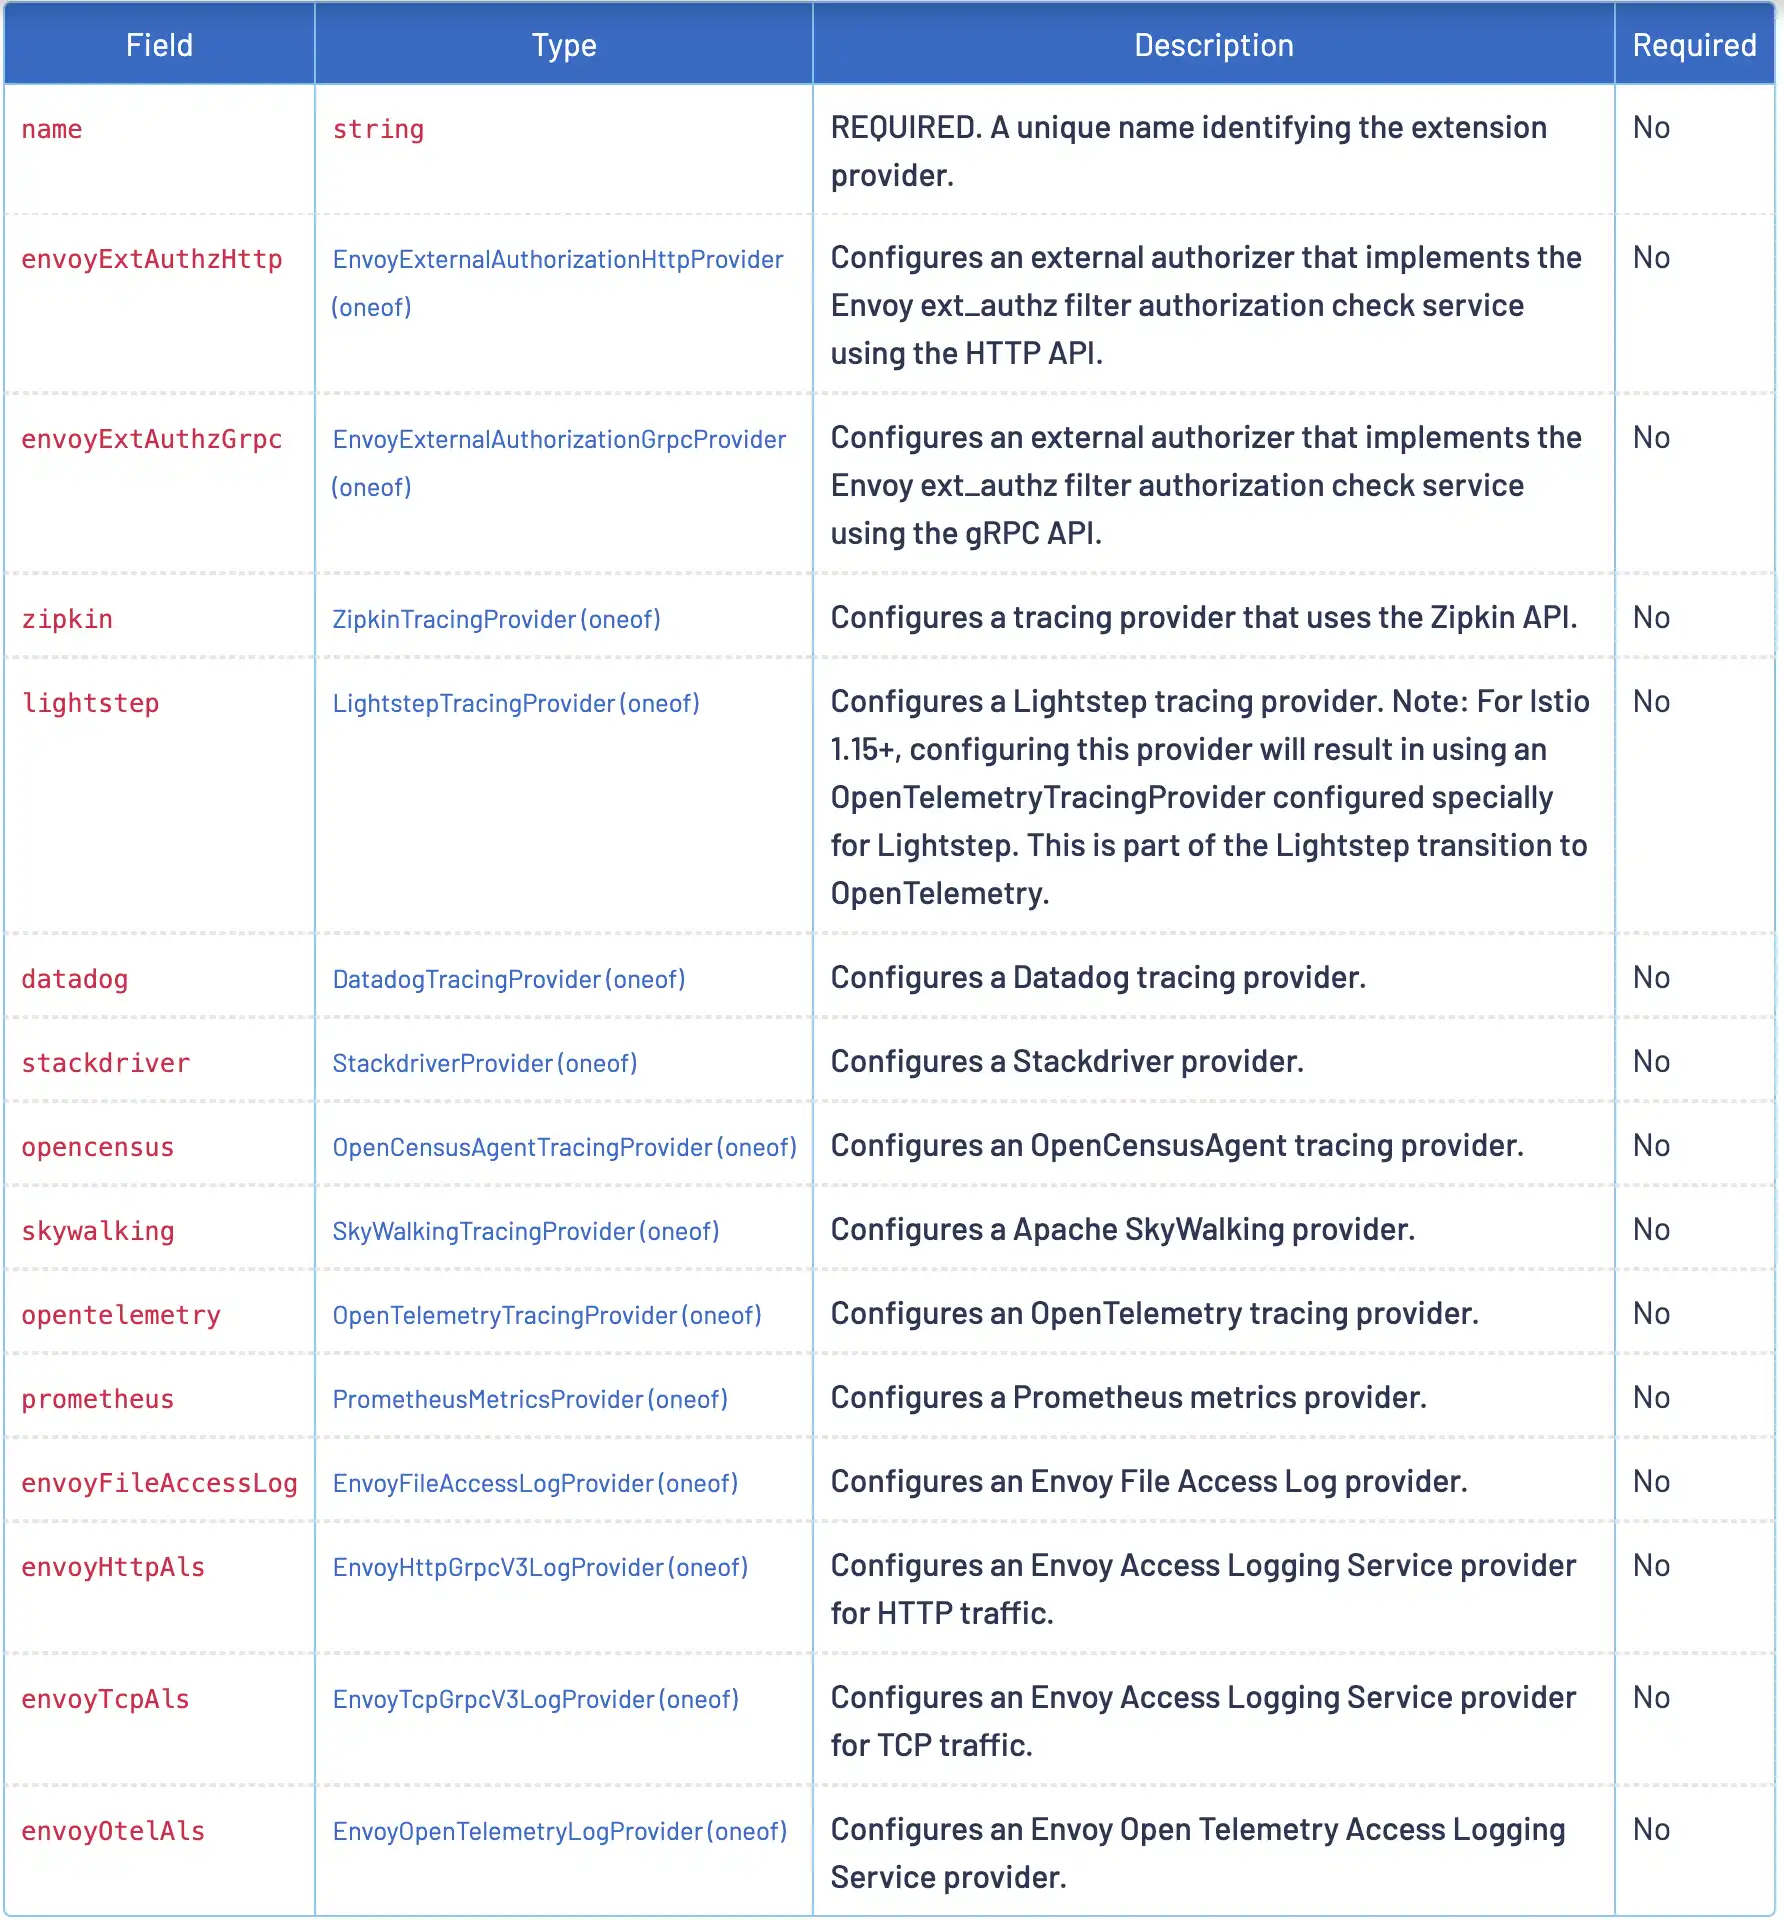
Istio comes with a few interesting extension points, like sandboxed programs for Envoy with WebAssembly / WASM, custom External Authorization services, or support for observability with the Telemetry API (Zipkin, Prometheus, Datadog, or more generally the new OpenTelemetry standard).
In this blog, we will use the envoyExtAuthzHttp extension provider to integrate Istio with Keycloak. This provider allows you to configure an external HTTP service to perform authorization checks on incoming requests. The service is expected to return a response with a specific format that will be used by Istio to decide whether the request should be allowed or not.

The Istio configuration will then look like the following:
  meshConfig:
    extensionProviders:
    - name: "webauthn"
      envoyExtAuthzHttp:
        service: ...
Oauth2-proxy
To trigger the OIDC flow and to bridge the gap between Istio and your IdP (Identity Provider), you need some glue (when you don’t have Gloo).
To accomplish this mission of starting the OIDC flow and authorizing requests (depending on whether the end-user is already considered authenticated), we will rely on the oauth2-proxy project. This open-source project is a reverse proxy that provides authentication with various OIDC Providers (Google, GitHub, GitLab, Okta, Keycloak, etc.).
The full configuration is visible further down this article, but here is the most interesting part of it:
  configFile: |-
    provider = "keycloak-oidc"
    provider_display_name = "KEYCLOAK"
    oidc_issuer_url = "https://${KEYCLOAK_DN}/realms/${KEYCLOAK_REALM}"
    login_url = "https://${KEYCLOAK_DN}/realms/${KEYCLOAK_REALM}/protocol/openid-connect/auth"
    redeem_url = "https://${KEYCLOAK_DN}/realms/${KEYCLOAK_REALM}/protocol/openid-connect/token"
    profile_url = "https://${KEYCLOAK_DN}/realms/${KEYCLOAK_REALM}/protocol/openid-connect/userinfo"
    upstreams = ["static://200"]
We indicate the well-known endpoints of the OIDC Provider, and we are good to go!
Also, oauth2-proxy is designed to proxy requests to the upstream service, but we don’t need this feature since we are using Istio. So we just need to return a 200 response to the client, and we are good to go!
Demo
Putting together security standards
So far, we have seen how to use WebAuthn to authenticate users without passwords and how to use Keycloak to manage the WebAuthn keys (generated by the Authenticator). We also saw how to use Istio to secure our applications and oauth2-proxy to start the OIDC flow and authorize requests.
So you may wonder how different is WebAuthn compared to other authentication methods like OpenID Connect, or OAuth2? It’s fine!
Quick reminder here: OpenID Connect is an extension of OAuth2 (adding extra info about the current end-user into an id_token). Neither OIDC nor OAuth2 describes how the end-user should be authenticated since OAuth2 primarily focuses on the authorization part. According to the OAuth2 spec, the IdP is in charge of the authentication. And we have Keycloak configured to use the WebAuthn step in the authentication flow. This step will be triggered if the end-user is not already authenticated and will ask the end-user to use his (registered beforehand) Authenticator to prove his identity.
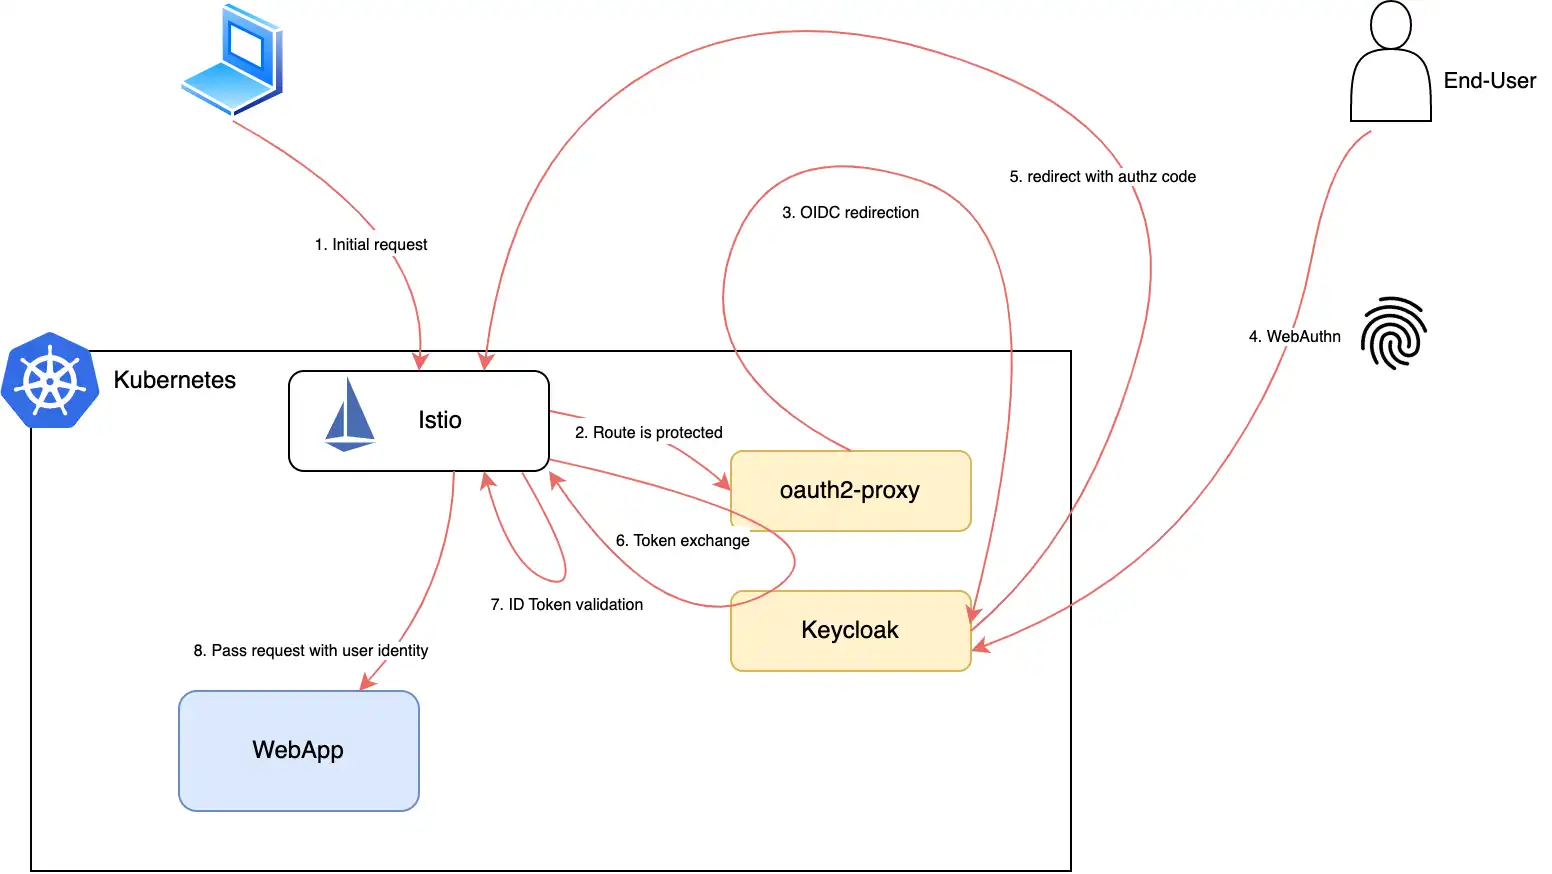
The big picture
Here is what we are going to build:
The setup
The setup consists of installing Istio, Keycloak, and oauth2-proxy. We will also deploy a simple backend app, HTTPBIN, that will be secured by Istio + WebAuthn.
Here are the global variables that we will use throughout the article:
export BASE_DN="bco.runlocal.dev"
export KEYCLOAK_DN="auth.${BASE_DN}"
export KEYCLOAK_REALM="corp-users"
export APIGW_DN="api.${BASE_DN}"
export ISTIO_VERSION=1.15.4
Istio
curl -L https://istio.io/downloadIstio | ISTIO_VERSION=${ISTIO_VERSION} TARGET_ARCH=x86_64 sh -

cd istio-${ISTIO_VERSION}

cat <<EOF > my-config.yaml
apiVersion: install.istio.io/v1alpha1
kind: IstioOperator
spec:
  profile: default
  hub: docker.io/istio
  tag: ${ISTIO_VERSION}
  revision: 1-15-4
  meshConfig:
    accessLogFile: /dev/stdout
    extensionProviders:
    - name: "webauthn"
      envoyExtAuthzHttp:
        service: "oauth2-proxy.oauth.svc.cluster.local"
        port: 80
        includeHeadersInCheck:
        - x-user
        - authorization
        - cookie
        headersToUpstreamOnAllow:
        - authorization
        - x-auth-request-user
        - x-auth-request-email
        - x-auth-request-preferred-username
EOF

./bin/istioctl install -f my-config.yaml -y

cd ..
Httpbin
kubectl create ns httpbin
kubectl label ns httpbin istio.io/rev=1-15-4
kubectl run httpbin --image=kennethreitz/httpbin -n httpbin --env="GUNICORN_CMD_ARGS=--capture-output --error-logfile - --access-logfile - --access-logformat '%(h)s %(t)s %(r)s %(s)s Host: %({Host}i)s'" --port 80 -l "app=httpbin"
kubectl expose po/httpbin --port=8000 --target-port=80 -n httpbin
Keycloak
You can reuse the realm config from this file: corp-users-realm.json
# Deploy Keycloak
k create ns oauth
k -n oauth apply -f https://raw.githubusercontent.com/keycloak/keycloak-quickstarts/20.0.2/kubernetes-examples/keycloak.yaml

# Import the pre-configured "corp-users" realm
KEYCLOAK_POD=$(kubectl get pods -n oauth -l app=keycloak -o jsonpath='{.items[0].metadata.name}')
cat ${KEYCLOAK_REALM}-realm.json | k exec -i ${KEYCLOAK_POD} -n oauth -- tee /tmp/corp.json > /dev/null
k exec -n oauth -ti ${KEYCLOAK_POD} bash
> cd /opt/keycloak/bin/
> ./kc.sh import --file /tmp/corp.json
# disregard the error messages
> exit

# Open the Keycloak admin UI
KEYCLOAK_IP=$(kubectl get svc keycloak -n oauth -o jsonpath='{.status.loadBalancer.ingress[0].ip}')
open "http://${KEYCLOAK_IP}:8080/admin/master/console/#/realms"
# login with admin/admin
(Optional) External DNS
Since WebAuthn works best with HTTPS, I wanted to have domain names for my setup with valid certificates. So I configured external-dns to create DNS records for my Istio VirtualServices, and cert-manager to generate certificates for them. I will not go into details here, but I might write a blog post about it later (especially since it works well with local Kind clusters and private IP addresses backed by Google Cloud DNS).
Below are the external-dns Helm values I used:
provider: google
extraArgs:
  - "--service-type-filter=LoadBalancer"
  - "--google-project=${GCP_PROJECT}"
env:
  - name: GOOGLE_APPLICATION_CREDENTIALS
    value: /etc/secrets/service-account/credentials.json
extraVolumeMounts:
  - name: google-service-account
    mountPath: /etc/secrets/service-account/
extraVolumes:
  - name: google-service-account
    secret:
      secretName: external-dns
sources:
  - service
  - istio-virtualservice
policy: upsert-only
registry: txt
txtOwnerId: "external-dns-local-kind"
domainFilters:
  - "${BASE_DN}"
logLevel: debug
Istio routing for Keycloak
# TLS gateway
# Create a new secret with the wildcard cert
# Secret must be in the same namespace as the gateway pod
export path_to_cert=".../certs"
kubectl create secret tls wildcard-tls --key ${path_to_cert}/wildcard-bco-runlocal-dev.key --cert ${path_to_cert}/wildcard-bco-runlocal-dev.crt -n istio-system

kubectl apply -f - <<EOF
apiVersion: networking.istio.io/v1beta1
kind: Gateway
metadata:
  name: tls-gateway
  namespace: default
spec:
  selector:
    istio: ingressgateway
  servers:
  - port:
      number: 443
      name: https
      protocol: HTTPS
    tls:
      mode: SIMPLE
      credentialName: wildcard-tls
    hosts:
    - "*.${BASE_DN}"
EOF

# Expose keycloak with Istio, over TLS
kubectl apply -f - <<EOF
apiVersion: networking.istio.io/v1beta1
kind: VirtualService
metadata:
  name: keycloak
  namespace: oauth
spec:
  gateways:
  - default/tls-gateway
  hosts:
  - "${KEYCLOAK_DN}"
  http:
  - match:
    - uri:
        prefix: /
    route:
    - destination:
        host: keycloak.oauth.svc.cluster.local
        port:
          number: 8080
EOF

# check the DNS record was created by external-dns
oauth2-proxy
Oauth2-proxy command line options are documented here. Since user session data became too large for cookies when populated with user info, I had to enable Redis as a session storage backend.
# Deploy Redis
k run redis --image redis -n oauth
k expose po redis -n oauth --port 6379

# OAuth2-proxy Helm values
cat <<EOF > oauth2-proxy-values.yaml
# Oauth client configuration specifics
config:
  # OAuth client ID
  clientID: "gloo"
  # OAuth client secret
  clientSecret: "MsQLofFupVbCi6iYMYJ2qrVn6rR8e2jN"
  # Create a new secret with the following command
  # openssl rand -base64 32 | head -c 32 | base64
  # Use an existing secret for OAuth2 credentials (see secret.yaml for required fields)
  # Example:
  # existingSecret: secret
  cookieSecret: "DV0Y+mXgqT4Duitw16amd8TZjl/bQVou"
  # The name of the cookie that oauth2-proxy will create
  # If left empty, it will default to the release name
  cookieName: ""
  # Default configuration, to be overridden
  configFile: |-
    provider = "oidc"
    provider_display_name = "KEYCLOAK"
    oidc_issuer_url = "https://${KEYCLOAK_DN}/realms/${KEYCLOAK_REALM}"
    login_url = "https://${KEYCLOAK_DN}/realms/${KEYCLOAK_REALM}/protocol/openid-connect/auth"
    redeem_url = "https://${KEYCLOAK_DN}/realms/${KEYCLOAK_REALM}/protocol/openid-connect/token"
    profile_url = "https://${KEYCLOAK_DN}/realms/${KEYCLOAK_REALM}/protocol/openid-connect/userinfo"
    validate_url = "https://${KEYCLOAK_DN}/realms/${KEYCLOAK_REALM}/protocol/openid-connect/userinfo"
    ssl_insecure_skip_verify = true
    skip_provider_button = true
    email_domains = ["*"]
    insecure_oidc_allow_unverified_email = true
    scope = "email profile openid"
    oidc_extra_audiences = ["gloo"]
    cookie_secure = true
    pass_host_header = true
    pass_user_headers = true
    standard_logging = true
    auth_logging = true
    request_logging = true
    upstreams = ["static://200"]
    set_xauthrequest = true
    set_authorization_header = true # oddly pass the id_token as Authorization header
sessionStorage:
  # Can be one of the supported session storage cookie|redis
  type: redis
  redis:
    # Name of the Kubernetes secret containing the redis & redis sentinel password values (see also "sessionStorage.redis.passwordKey")
    existingSecret: ""
    # Redis password value. Applicable for all Redis configurations. Taken from redis subchart secret if not set. "sessionStorage.redis.existingSecret" takes precedence
    password: ""
    # Key of the Kubernetes secret data containing the redis password value
    passwordKey: "redis-password"
    # Can be one of standalone|cluster|sentinel
    clientType: "standalone"
    standalone:
      connectionUrl: "redis://redis.oauth.svc.cluster.local:6379"
EOF

helm upgrade -i oauth2-proxy oauth2-proxy/oauth2-proxy --create-namespace -n oauth -f oauth2-proxy-values.yaml
More Istio routing
To route the traffic to the HTTPBIN service, we are using the same Gateway but another VirtualService:
# Expose HTTPBIN and Oauth2-proxy with Istio, over TLS
kubectl apply -f - <<EOF
apiVersion: networking.istio.io/v1beta1
kind: VirtualService
metadata:
  name: httpbin
  namespace: httpbin
spec:
  gateways:
  - default/tls-gateway
  hosts:
  - "${APIGW_DN}"
  http:
  - match: # route requests starting with /oauth2 to oauth2-proxy
    - uri:
        prefix: /oauth2/*
    route:
    - destination:
        host: oauth2-proxy.oauth.svc.cluster.local
        port:
          number: 80
  - match: # route other requests to the httpbin service
    - uri:
        prefix: /
    route:
    - destination:
        host: httpbin.httpbin.svc.cluster.local
        port:
          number: 8000
EOF

# AuthzPolicy
k apply -f - <<EOF
apiVersion: security.istio.io/v1beta1
kind: AuthorizationPolicy
metadata:
  name: webauthn
  namespace: istio-system
spec:
  selector:
    matchLabels:
      app: istio-ingressgateway # apply to the Istio Ingress Gateway pod
  action: CUSTOM
  provider:
    name: "webauthn"
  rules:
  - to:
    - operation:
        hosts: ["${APIGW_DN}"] # only for the API domain
EOF
More Istio security (optional)
Let’s switch to the Zero-Trust mode and add more security to the mesh: we want to forbid access to the HTTPBIN service from other services running in the cluster and only allow access from the Istio Ingress Gateway.
# Double check the request comes with a JWT that was signed by our IdP (and JWT is not expired)
k apply -f - <<EOF
apiVersion: security.istio.io/v1beta1
kind: RequestAuthentication
metadata:
  name: check-jwt-from-idp
  namespace: httpbin
spec:
  selector:
    matchLabels:
      app: httpbin # apply to the httpbin service
  jwtRules:
  - issuer: "https://${KEYCLOAK_DN}/realms/corp-users"
    jwksUri: "https://${KEYCLOAK_DN}/realms/corp-users/protocol/openid-connect/certs"
EOF
# only allow requests from the Istio Ingress Gateway
k apply -f - <<EOF
apiVersion: security.istio.io/v1beta1
kind: AuthorizationPolicy
metadata:
  name: check-req-from-gateway
  namespace: httpbin
spec:
  selector:
    matchLabels:
      app: httpbin # apply to the httpbin service
  action: ALLOW
  rules:
  - from:
    - source:
        principals: ["cluster.local/ns/istio-system/sa/istio-ingressgateway-service-account"]
EOF
End-to-end test
Time to test the whole setup:
# Open the application in your browser
open "https://${APIGW_DN}/headers"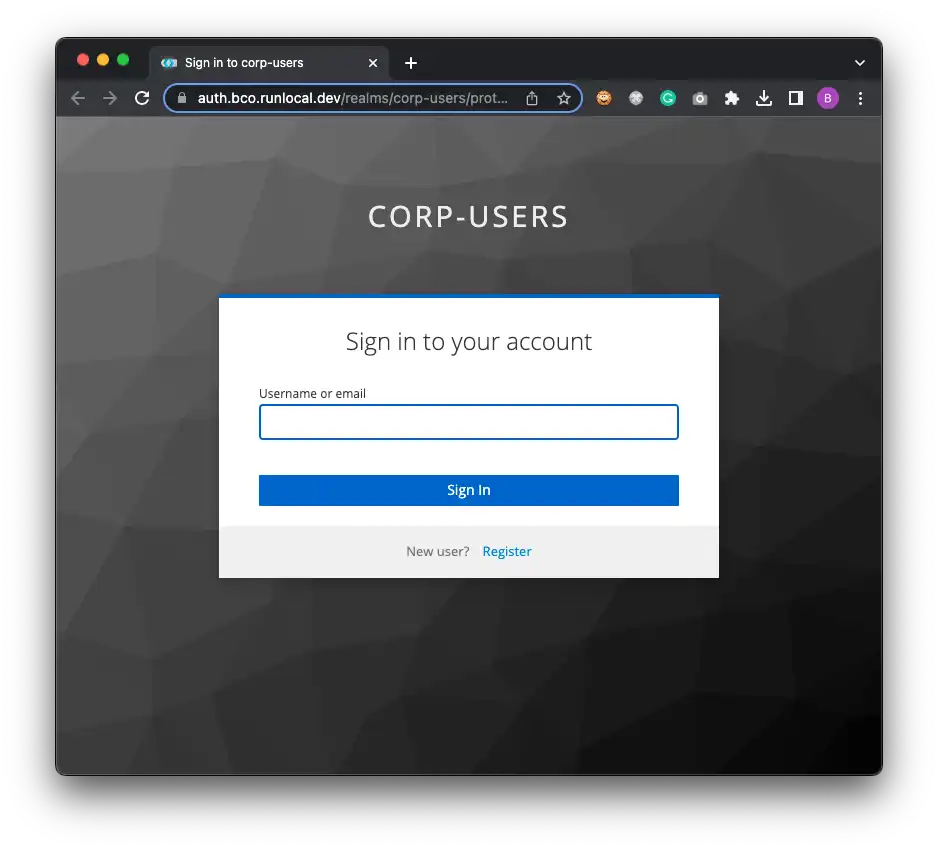

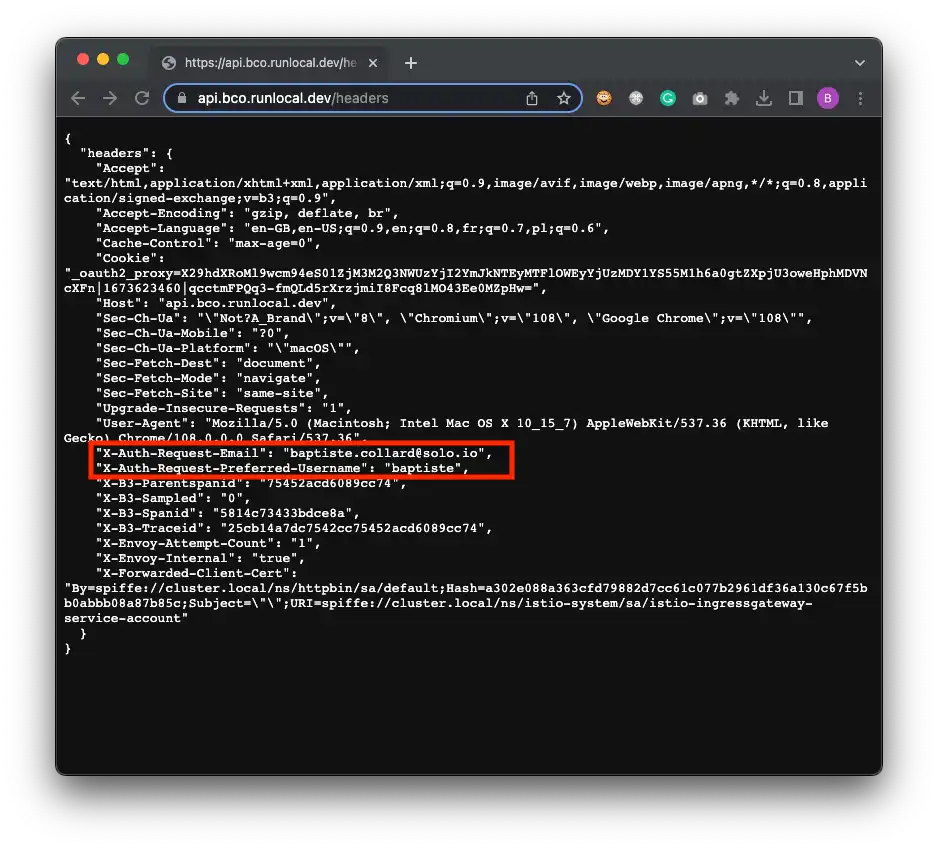
Congrats! You have successfully implemented passwordless authentication with WebAuthn and Keycloak, and secured your backend with Istio. If you paid attention to the Istio configuration, you will have noticed that we even scratched the surface of Zero-Trust networking.
Closing thoughts
Istio is standing out as the de-facto standard for service mesh. It is a robust framework to secure your applications in a cluster and also across your clusters. This is what we generally call east-west traffic.
With WebAuthn enabled at the edge of your cluster(s), you are now securing the north-south traffic with strong end-user authentication. This is a small step in your SRE duties but should be future-proof.