Run multiple Kubernetes clusters on MacOS with LoadBalancer support
|
MAJOR UPDATE on Jun. 18, 2026
This guide is now superseded by klimax, a CLI that automates everything described here. Check it out at https://klimax.runlocal.dev/ and the underlying repo at https://github.com/bcollard/klimax klimax spins up one or more kind clusters on macOS (Lima + Docker + kind) with LoadBalancer support, no Docker Desktop required. |

Configure your MacBook to run multiple Kubernetes clusters, using KinD, with support for services type LoadBalancer. No need for kubectl port-forward, you can use your favorite GNU tools and, the cherry on the cake, you don’t have to install Docker Desktop! How nice?
Demo
|
UPDATE on Oct. 6, 2022:
|
|
UPDATE on Jan. 10, 2022:
|
Overview
There are many ways to run KinD clusters on your Mac. They all require a VM at some point because Docker runs with in Linux environments. This article aims to show how you can run these KinD clusters and still work comfortably from your Mac, with your favorite tools.
After the recent announcements from Docker Inc — which are legit — many of us have been looking into alternatives to run OCI images, and Kubernetes clusters as well. I still believe Docker is a good platform, but UX can be improved for MacOS Kubernetes users - especially on integrating with MetalLB. Anyway, in this guide, we will use Docker-CE in a VM.
Lima is one of the emerging solutions that can meet many requirements for MacOS users. With a simple CLI, you can start a VM and run different container runtimes, like containerd, docker, postman, and more.
A recent PR permits to mount sockets to your VM, so that you can, for example, run docker commands from the host (your mac).
Unlike other virtualization software, Lima is based on QEMU, which goes beyond my knowledge, but I understood it has a smaller footprint.
Below is a big picture of the setup:
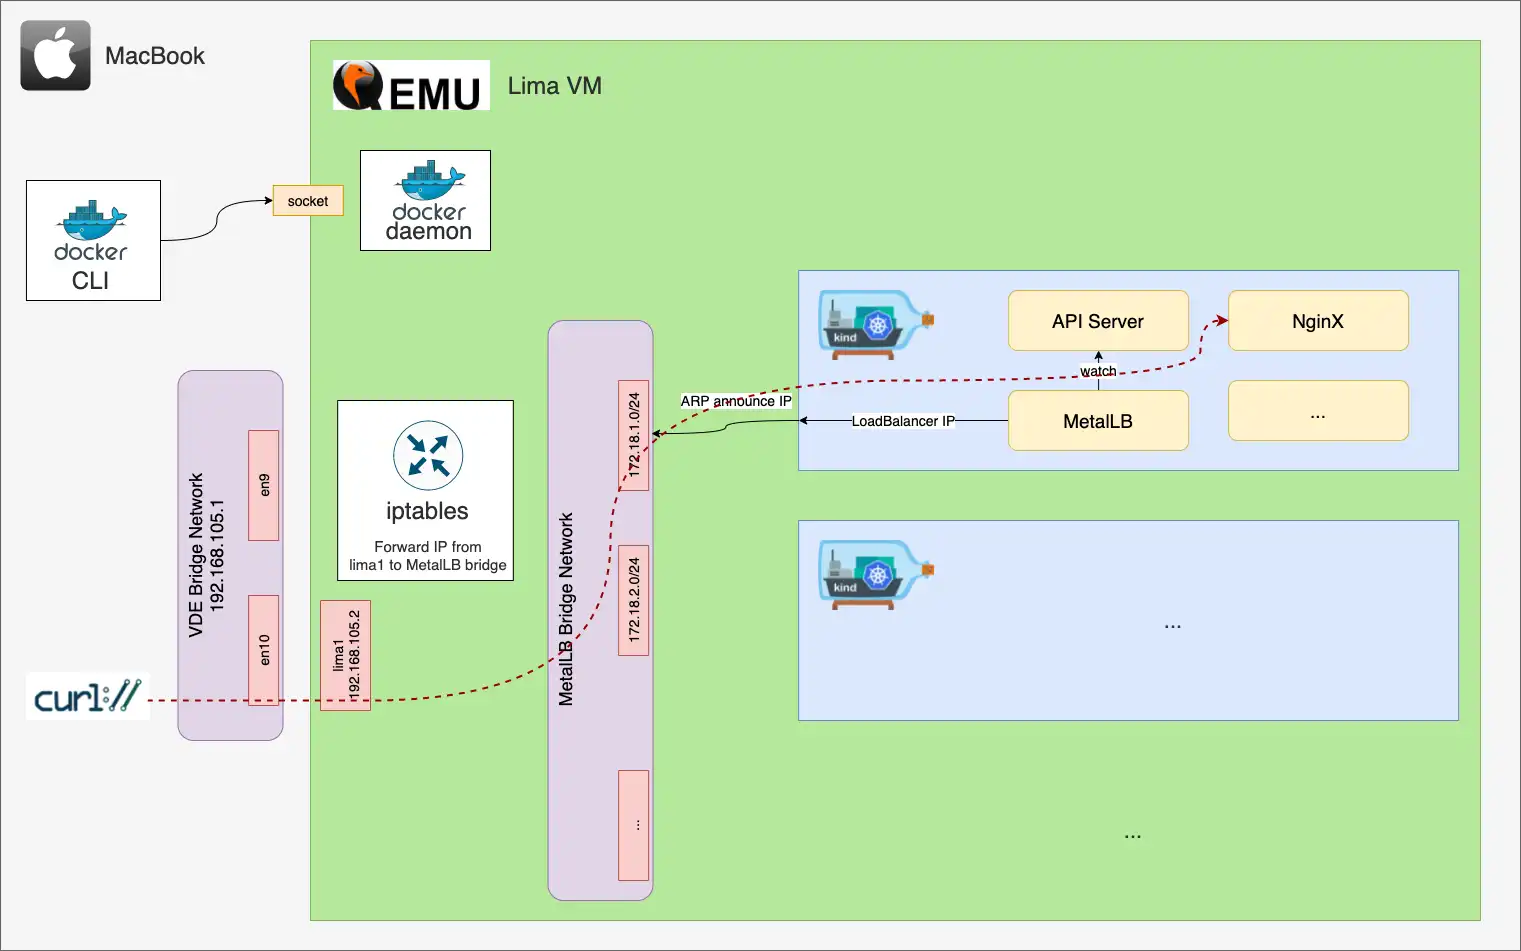
Lima is a great solution! By default, it is configured so that you can access the Host from the VM, via the gateway 192.168.5.15 on eth0. As opposite, you cannot access the VM from the Host. In this regard, you need to install some additional networking components: vde_switch and vde_vmnet
|
Source code
Source code for this blog post is available at https://github.com/bcollard/kind-on-lima-public |
Setup part 1: MacOS network prerequisites
As shown in the introduction and as a MacOS user, there is some network configuration you must through before running docker or kubectl commands. The main goal is to connect your macbook machine to the Kubernetes clusters.
So, in addition to Lima (see the next section), there is a required binary to install on your macOS machine: socket_vmnet.
10,000 foot view… Socket VMnet creates a bridge network with your macbook host and the Lima VM. VMnet is required for adding another guest IP that is accessible from the host and other guests.
To install socket_vmnet, I followed the instructions there: https://github.com/lima-vm/socket_vmnet
Below are the commands I used to create the binary:
brew upgrade autoconf

# VDE_VMNET
git clone git@github.com:lima-vm/socket_vmnet.git
cd socket_vmnet
sudo make PREFIX=/opt/socket_vmnet install.bin # tiny change here on the target
# the reason being we don't want a new LaunchDaemon on the host,
# but rather Lima to manage this network interface on its own.
# Also, check the new binaries under /opt/socket_vmnet/bin/
Fortunately, Lima can now manage the complete lifecycle of the VMnet network interface. When you start the Lima VM, Lima will create the VMnet interface, and Lima will also delete that network interface when you stop the VM. You will find more details in this article.
This same article also explains how the binaries are looked up on your machine. Default values are the following in $LIMA_HOME/_config/networks.yaml:
paths:
  socketVMNet: /opt/socket_vmnet/bin/socket_vmnet # socketVMNet has precedence over vdeVMNet.
  vdeSwitch: /opt/vde/bin/vde_switch
vdeVMNet: /opt/vde/bin/vde_vmnetAfter modifying the networks.yaml file, you must run the following command:
limactl sudoers | sudo tee /etc/sudoers.d/lima
# double check the file content
Setup part 2: Lima with Docker
Install LIMA - "LInux on MAc":
# version 0.12.0 is preferred
brew install lima
To configure the Lima VM, you must define a yaml file, as shown in the repository examples. The following configuration file is mostly inspired from the examples/docker.yaml file. Differences include:
-
install Docker as non-root user, instead of rootless. Otherwise, the docker network bridge for KinD will not be created.
-
expose the Docker socket to the Host
-
use of a managed VMnet network
Of course, you can also adjust the number of CPUs, the disk size and memory resource limits for the VM.
Start the VM and eventually SSH to it:
limactl start ./docker.yaml
# the name of the VM will be the name of the config file, here "docker"
# After a few dozens of seconds, the VM should be running
limactl shell docker
...
exit
Today, a reboot of the Lima VM is required for the Docker socket "SSH port-forward" to take effect. Run the following commands:
limactl stop docker
limactl start docker
You can run inline shell commands or SSH to the VM.
# Option 1
export LIMA_INSTANCE=docker
lima
$> ...
# Option 2
limactl shell docker
$> ...
# Option 3 - inline commands
limactl shell docker -- uname -a
Check the network connectivity and the routes on the Lima VM:
limactl shell docker -- ping google.com
# if it fails, print the active routes:
limactl shell docker -- route
# you should see something like that:
Kernel IP routing table
Destination     Gateway         Genmask         Flags Metric Ref    Use Iface
default         host.lima.inter 0.0.0.0         UG    100    0        0 eth0
default         _gateway        0.0.0.0         UG    100    0        0 lima0
172.17.0.0      0.0.0.0         255.255.0.0     U     0      0        0 docker0
192.168.5.0     0.0.0.0         255.255.255.0   U     0      0        0 eth0
host.lima.inter 0.0.0.0         255.255.255.255 UH    100    0        0 eth0
192.168.105.0   0.0.0.0         255.255.255.0   U     0      0        0 lima0
_gateway        0.0.0.0         255.255.255.255 UH    100    0        0 lima0
Setup part 3: the docker CLI
With this setup, running Docker for Mac, a.k.a. Docker Desktop is not mandatory. The docker CLI is enough.
There are a few options to get the docker CLI. The simplest one is probably the brew package manager. Keep in mind the difference between brew install docker, which will install the CLI, and brew install --cask docker, which will install Docker Desktop.
Another option is to build it locally and to add it to your path.
In all cases, you will need to configure docker to connect to the Docker daemon running in the Lima VM:
# 1st option:
brew install docker

# 2nd option:
brew install --cask docker

# 3rd option:
git clone git@github.com:docker/cli.git
cd cli
docker buildx bake # this is a bit awkward, I know! :-)
export PATH=$PATH:$PWD/build

# In any case, configure docker:
export DOCKER_HOST=unix://$HOME/docker.sock
Now you can run docker commands from your machine, with Docker running in the VM:
docker ps
CONTAINER ID   IMAGE     COMMAND   CREATED   STATUS    PORTS     NAMES
Setup part 4: KinD, MetalLB and Docker registries
Concerning KinD and MetalLB, you can start with the official instructions:
-
Integration with MetalLB: https://kind.sigs.k8s.io/docs/user/loadbalancer/
Additionally, you may find necessary to cache the Docker images that are pulled by the kubelet over the time. For that to work, you need to configure containerd to connect to the registries instead of using a direct connection to the public docker hubs.
The script is self-explanatory:
Once you have a KinD cluster up and running, test it out with a service type LoadBalancer:
# on your macbook
kubectl run nginx --image nginx
kubectl expose po/nginx --port 80 --type LoadBalancer
kubectl get svc

# on the Lima VM
limactl shell docker

curl -I 172.18.1.1
As you can see, it’s working!
Take a quick look at the routing table:
# on the Lima VM
# limactl shell docker

ip route
# default via 192.168.105.1 dev lima1 proto dhcp src 192.168.105.2 metric 100
# default via 192.168.5.2 dev eth0 proto dhcp src 192.168.5.15 metric 100
# default via 192.168.105.1 dev lima0 proto dhcp src 192.168.105.3 metric 100
# 172.17.0.0/16 dev docker0 proto kernel scope link src 172.17.0.1 linkdown
# 172.18.0.0/16 dev br-078c5e602e30 proto kernel scope link src 172.18.0.1 linkdown
# 192.168.5.0/24 dev eth0 proto kernel scope link src 192.168.5.15
# 192.168.5.2 dev eth0 proto dhcp scope link src 192.168.5.15 metric 100
# 192.168.105.0/24 dev lima1 proto kernel scope link src 192.168.105.2
# 192.168.105.0/24 dev lima0 proto kernel scope link src 192.168.105.3
# 192.168.105.1 dev lima1 proto dhcp scope link src 192.168.105.2 metric 100
# 192.168.105.1 dev lima0 proto dhcp scope link src 192.168.105.3 metric 100
The line 172.18.0.0/16 dev br-078c5e602e30 proto kernel scope link src 172.18.0.1 linkdown shows that the MetalLB subnet is routed to a bridge interface.
Setup part 5: end-to-end network connectivity
From this point, if you try curl’ing any of the MetalLB IP addresses from your machine, you’ll get a timeout.
There are two reasons for that:
-
the MetalLB subnets are not routable from your machine
-
you must configure the Lima VM to forward IP packets from its Host (here a macbook) to Kubernetes.
Let’s go through these two points.
First, ensure you have the VMnet bridge up and configured as expected:
# on your macbook
$> ifconfig bridge100

bridge100: flags=8a63<UP,BROADCAST,SMART,RUNNING,ALLMULTI,SIMPLEX,MULTICAST> mtu 1500
	options=3<RXCSUM,TXCSUM>
	ether 16:7d:da:4a:94:64
	inet 192.168.105.1 netmask 0xffffff00 broadcast 192.168.105.255
	inet6 fe80::147d:daff:fe4a:9464%bridge100 prefixlen 64 scopeid 0x13
	inet6 fde3:70dc:b8b5:2bab:83d:c086:bd72:f757 prefixlen 64 autoconf secured
	Configuration:
		id 0:0:0:0:0:0 priority 0 hellotime 0 fwddelay 0
		maxage 0 holdcnt 0 proto stp maxaddr 100 timeout 1200
		root id 0:0:0:0:0:0 priority 0 ifcost 0 port 0
		ipfilter disabled flags 0x0
	member: vmenet0 flags=3<LEARNING,DISCOVER>
	        ifmaxaddr 0 port 18 priority 0 path cost 0
	Address cache:
		52:55:55:79:c2:11 Vlan1 vmenet0 1154 flags=0<>
	nd6 options=201<PERFORMNUD,DAD>
	media: autoselect
	status: active
What you should see:
-
the IPv4 address of your machine for this bridge interface: "192.168.105.1"
-
at least one member part of that bridge (here
vmenet0) -
the
status: active
Save this local IP address:
# on your macbook
$> export SRC_IP=$(ifconfig bridge100 | grep "inet " | cut -d' ' -f2)
# 192.168.105.1
Then take a look at the routing table on your machine:
# on your macbook
netstat -nr
There is no route to the VM for the subnet 172.18.0.0/16. Let’s fix that:
# on your macbook

# get the IP address of the LIMA VM on the lima0 interface
LIMA_IP_ADDR=$(limactl shell docker -- ip -o -4 a s | grep lima0 | grep -E -o 'inet [0-9]{1,3}\.[0-9]{1,3}\.[0-9]{1,3}\.[0-9]{1,3}' | cut -d' ' -f2)
echo ${LIMA_IP_ADDR}
# should return something like: 192.168.105.3

# add a route temporarily
sudo route -nv add -net 172.18 ${LIMA_IP_ADDR}

# add a permanent route
<TODO>
Verify the route is working correctly:
# on your macbook
traceroute 172.18.1.1
# traceroute to 172.18.1.1 (172.18.1.1), 64 hops max, 52 byte packets
# 1  192.168.105.3 (192.168.105.3)  1.403 ms  0.793 ms  0.462 ms
Now, you want the Lima VM to forward these requests to the KinD networks.
# on the Lima VM
# limactl shell docker

# get the bridge interface name
KIND_IF=$(ip -o link show | awk -F': ' '{print $2}' | grep "br-")
# source IP (on your Mac)
SRC_IP=192.168.105.1
# MetalLB subnet
DST_NET=172.18.0.0/16
HOST_IF=lima0
# add the forward rule
sudo iptables -t filter -A FORWARD -4 -p tcp -s ${SRC_IP} -d ${DST_NET} -j ACCEPT -i ${HOST_IF} -o ${KIND_IF}
# verify the rule is applied
sudo iptables -L
Final test:
# on your macbook

curl -I 172.18.1.1
HTTP/1.1 200 OK
Server: nginx/1.21.4
Date: Fri, 12 Nov 2021 23:10:37 GMT
Content-Type: text/html
Content-Length: 615
Last-Modified: Tue, 02 Nov 2021 14:49:22 GMT
Connection: keep-alive
ETag: "61814ff2-267"
Accept-Ranges: bytes
Closing words
Obviously, the setup is a bit tedious. There is room for improvement.
Previously, I used to work with Docker Desktop, associated with the no longer maintained Tuntap shim. That was neither stable nor future proof. Plus, running three clusters made my macbook CPUs heat a lot!
I’ve been working with this setup over one month and I’m pretty happy with it!
Using a VM provisioned with Vagrant or Rancher Desktop are other valid solutions, but you will need to tweak the networking as well.
Finally, during my experiments, I’ve seen another similar initiative, project name Colima. I guess it’s worth a try!